Introduction
In this article, we will learn about how to create a simple Hello World custom module in Magento 2.
This module creates a basic “Hello World” page in Magento 2. It follows the standard module structure and demonstrates key concepts like routing, controllers, blocks, helpers, and templates.
Before create simple module, you can take reference here about how to install Magento 2 using composer.
Module Structure
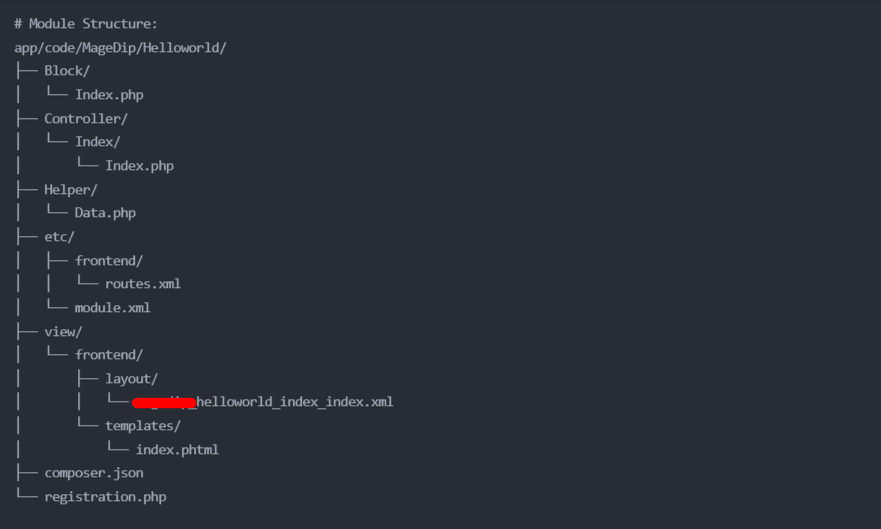
Create Magento 2 Custom Module - MageDip_Helloworld
Let’s create custom module, I’ll explain each file’s purpose and functionality in a concise way:
First Step:
- Create the directory structure in
app/code/MageDip/Helloworld/ - Copy all below files maintaining the structure
Step 1: registration.php
- Registers the module with Magento
- Tells Magento where to find module files
- Essential for module recognition
File: app/code/MageDip/Helloworld/registration.php
<?php
/**
 * @category  MageDip
 * @package   MageDip_Helloworld
 * @author    MageDip
 * @copyright Copyright (c) 2025 MageDip (https://www.magedip.com)
 */
use Magento\Framework\Component\ComponentRegistrar;

ComponentRegistrar::register(
    ComponentRegistrar::MODULE,
    'MageDip_Helloworld',
    __DIR__
);
Step 2: composer.json
- Defines module dependencies
- Contains module metadata (name, version, author)
- Specifies autoloading rules
- Key for module distribution
File: app/code/MageDip/Helloworld/composer.json
{
    "name": "magedip/module-helloworld",
    "description": "A basic Magento 2 module example",
    "type": "magento2-module",
    "version": "1.0.0",
    "license": "proprietary",
    "authors": [
        {
            "name": "MageDip",
            "email": "support@magedip.com"
        }
    ],
    "require": {
        "php": "~7.4.0||~8.3.0"
    },
    "autoload": {
        "files": [
            "registration.php"
        ],
        "psr-4": {
            "MageDip\\Helloworld\\": ""
        }
    }
}
Step 3: etc/module.xml
- Declares module version
- Sets up module dependencies
- Defines module sequence in Magento
- Core configuration file
File: app/code/MageDip/Helloworld/etc/module.xml
<?xml version="1.0"?>
<config xmlns:xsi="http://www.w3.org/2001/XMLSchema-instance"
        xsi:noNamespaceSchemaLocation="urn:magento:framework:Module/etc/module.xsd">
    <module name="MageDip_Helloworld" setup_version="1.0.0">
        <sequence>
            <module name="Magento_Backend"/>
        </sequence>
    </module>
</config>
Step 4: etc/frontend/routes.xml
- Defines frontend URL routing
- Sets up URL path: helloworld//
- Maps URLs to controllers
- Example URL: domain.com/helloworld/index/index
File: app/code/MageDip/Helloworld/etc/frontend/routes.xml
<?xml version="1.0"?>
<config xmlns:xsi="http://www.w3.org/2001/XMLSchema-instance"
        xsi:noNamespaceSchemaLocation="urn:magento:framework:App/etc/routes.xsd">
    <router id="standard">
        <route id="helloworld" frontName="helloworld">
            <module name="MageDip_Helloworld"/>
        </route>
    </router>
</config>
Step 5: Controller/Index/Index.php
- Handles incoming requests
- Entry point for the module’s main page
- Uses PageFactory to render the page
- Controls what happens when someone visits the module URL
File: app/code/MageDip/Helloworld/Controller/Index/Index.php
<?php
/**
 * @category  MageDip
 * @package   MageDip_Helloworld
 */
namespace MageDip\Helloworld\Controller\Index;

use Magento\Framework\App\Action\HttpGetActionInterface;
use Magento\Framework\Controller\ResultInterface;
use Magento\Framework\View\Result\PageFactory;

class Index implements HttpGetActionInterface
{
    /**
     * @var PageFactory
     */
    protected $resultPageFactory;

    /**
     * Constructor
     *
     * @param PageFactory $resultPageFactory
     */
    public function __construct(PageFactory $resultPageFactory)
    {
        $this->resultPageFactory = $resultPageFactory;
    }

    /**
     * Execute view action
     *
     * @return ResultInterface
     */
    public function execute(): ResultInterface
    {
        return $this->resultPageFactory->create();
    }
}
Step 6: Block/Index.php
- Contains display logic
- Provides data to template files
- Acts as bridge between controller and template
- Holds business logic for the view
File: app/code/MageDip/Helloworld/Block/Index.php
<?php
/**
 * @category  MageDip
 * @package   MageDip_Helloworld
 */
namespace MageDip\Helloworld\Block;

use Magento\Framework\View\Element\Template;

class Index extends Template
{
    /**
     * Constructor
     *
     * @param \Magento\Framework\View\Element\Template\Context  $context
     * @param array $data
     */
    public function __construct(
        \Magento\Framework\View\Element\Template\Context $context,
        array $data = []
    ) {
        parent::__construct($context, $data);
    }

    /**
     * Get hello world text
     *
     * @return string
     */
    public function getHelloWorldText()
    {
        return 'Hello World!';
    }

    /**
     * Get module welcome message
     *
     * @return string
     */
    public function getWelcomeMessage()
    {
        return 'Welcome to our first Magento 2 module!';
    }
}
Step 7: Helper/Data.php
- Contains reusable functions
- Provides utility methods
- Can be used across the module
- Common place for shared functionality
File: app/code/MageDip/Helloworld/Helper/Data.php
<?php
/**
 * @category  MageDip
 * @package   MageDip_Helloworld
 */
namespace MageDip\Helloworld\Helper;

use Magento\Framework\App\Helper\AbstractHelper;

class Data extends AbstractHelper
{
    /**
     * Get module welcome message
     *
     * @return string
     */
    public function getWelcomeMessage()
    {
        return 'Welcome to our first Magento 2 module!';
    }
}
Step 8: view/frontend/layout/helloworld_index_index.xml
- Defines page structure
- Specifies which blocks to use
- Sets template file
- Controls how content is displayed
File: app/code/MageDip/Helloworld/view/frontend/layout/helloworld_index_index.xml
<?xml version="1.0"?>
<page xmlns:xsi="http://www.w3.org/2001/XMLSchema-instance" layout="1column" xsi:noNamespaceSchemaLocation="urn:magento:framework:View/Layout/etc/page_configuration.xsd">
    <body>
        <referenceContainer name="content">
            <block class="MageDip\Helloworld\Block\Index"
                name="helloworld_index_index"
                template="MageDip_Helloworld::index.phtml"/>
        </referenceContainer>
    </body>
</page>
Step 9: view/frontend/templates/index.phtml
- Contains actual HTML markup
- Displays data from blocks
- Uses proper escaping for security
- The actual view file users see
File: app/code/MageDip/Helloworld/view/frontend/templates/index.phtml
<?php
/** @var \MageDip\Helloworld\Block\Index $block */
?>
<div class="magedip-helloworld">
    <h1><?= $block->escapeHtml($block->getHelloWorldText()) ?></h1>
    <p><?= $block->escapeHtml($block->getWelcomeMessage()) ?></p>
</div>
General Flow:
URL Request → routes.xml → Controller → Block → TemplateTo install the module:
Let’s run these commands to install magento 2 custom module to your store:
php bin/magento setup:upgrade
php bin/magento setup:di:compile
php bin/magento cache:flush
The module will be accessible at: yourdomain.com/helloworld
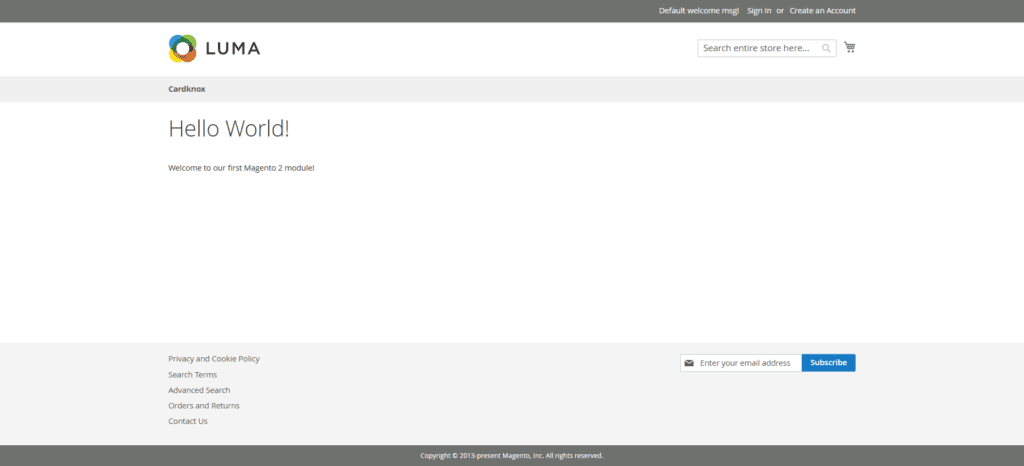
Conclusion
This basic module provides a foundation that can be built upon for more complex functionality. It demonstrates proper Magento 2 module architecture while keeping the code simple and maintainable. The module can be extended by adding more controllers, blocks, and templates as needed.
Key Features:
- Clean, maintainable code structure
- Follows PSR-4 autoloading standards
- Proper use of dependency injection
- Complete docblocks and comments
- Secure output escaping in templates
- Follows Magento 2 coding standards
I hope this tutorial is easy to understand about how to create custom 2 module in Magento 2. In case, I missed anything, always feel free to leave a comment in this blog, I’ll get back with proper solution.
Thank you for reading this article. Happy Coding!!!